What is a peer group?
A peer group is a set of credit unions or banks (either/or, not in the same peer group) that serves as a comparison set. When selected, you can use them to benchmark and analyze the performance of an individual institution (your primary).
By default, Peer will display the average performance of this group on graphs or charts. Many of the charts will show you the underlying data for all the institutions within the group on one of the display tabs.
You create peer groups in one of three ways:
- Selecting the specific individual institutions that you want to use
- Using custom criteria to create a peer group (financials, geography, and more)
- Uploading a list of charter numbers and using that set as a peer group
Peer groups lie at the core of how to use Peer-to-Peer. By understanding how to use them to suit your analytical needs, you’ll be positioned to get the most value out of Peer-to-Peer.
How to Create a Peer Group
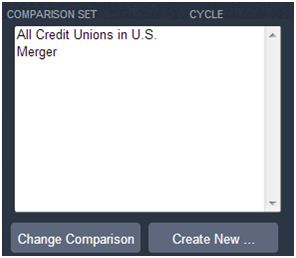
Go to the ‘Comparison Set’ drop-down menu and select ‘Create New’
Important: Why select one institution versus a group of institutions?
- Selecting individual institutions is a good choice when you already know the set group of credit unions or banks you want to benchmark against.
- Selecting institutions by criteria is a good option when you want to compare yourself to credit unions with similar characteristics (size, geographic region, membership, financial metrics, etc.).
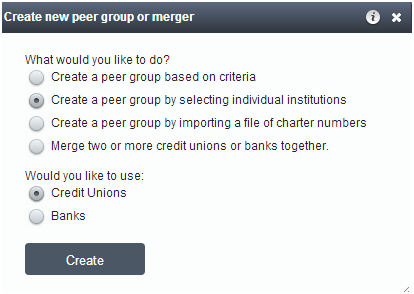
1.) Click ‘Create a peer group by selecting individual institutions’.
The ‘Create Peer Group’ window will appear:
2.) Use the State drop-down menu to select the location of the credit union you would like to select.
- Select a state
- A list of all of the credit unions in that state will auto-populate in the Matches box.
- You can sort the list by Name or Assets.
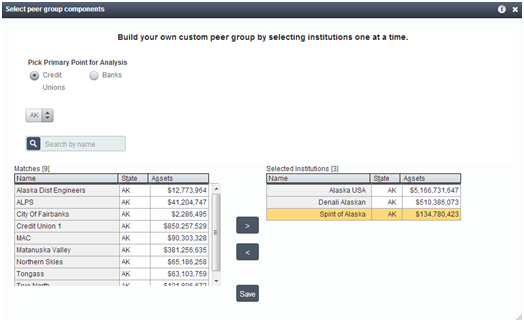
3.) If you would like to search for credit unions across all states, select All States in the State drop-down menu.
- A list of all available credit unions will auto-populate.
- You can sort the list by Name, State, or Assets.

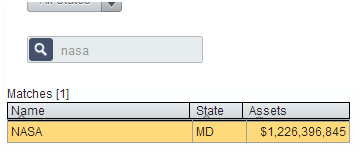
4.) You can also search for a credit union by name by typing the name of the credit union you are looking for in the Search text box.
The Matches box will auto-populate with credit unions containing the specified text.
5.) To select a credit union, click on it in the Matches box, and then click > (the Right Arrow).
You can also simply double-click on it in the Matches box. You will see your selected credit unions move to the Selected Credit Unions box on the right side.
6.) To remove a credit union from the Selected Credit Unions box, double click on it, or click on it and then click < (the left arrow).
7.) You must name and save your peer group in order to be able to use it in your analysis.
So you want to compare your institution’s performance with all other credit unions with $250-$500M in assets in California, but don’t want to try and select all of them from a list?
Build a custom peer group based on criteria – it will take no time at all.
- Choose the ‘Create a peer group based on criteria’ option
- Navigate through the set of tabs, selecting the criteria you want
- Add or exclude any additional institutions
- Save!
The criteria tabs you can customize are:
- Financials: You can specify any financial criteria, from assets or liabilities to more complex formulas. You’re able to search for the formula you want, specify by account code, or add your own formulas.
- Geography: Include or exclude institutions on the NCUA region, state, and county level. You can select geographic conditions to include institutions whose headquarters are in your selection, which have at least X number of branches in your selection, or X percent of their branches in your selection.
- Charter/FOM: Customize your peer group by including only institutions with a specific charter type or types and or certain fields of membership.
- Top/Bottom: Specify that you’d like to include institutions that are in top or bottom X (your input) number or percent in the financial metric of your choice. In addition to top or bottom, you can also have the system select the number or percent of institutions closest to your primary institution. For example: The top 10 percent of credit unions in $ Employee Compensation & Benefits.
- Vendors: You’re able to select credit unions that use specific vendors and can choose multiple combinations of vendor service areas. For example: You can set it to include credit unions who use Clifton Larsen Allen for auditing AND use Fiserv for debit pin processing.
- Include/Exclude: The include exclude tab is your opportunity to add or subtract institutions to the peer group to hone it beyond your criteria selections. You can upload a list of charter numbers to exclude or search for institutions and manually include or exclude them.
Peer-to-Peer lets you import peer groups using credit union charter numbers. To do this, paste a list of all the credit union charter numbers for those credit unions you wish to comprise your group and save the file as either a .txt or an Excel file.
Important: To import a list of credit unions, include only a list of their charter numbers in your file. Do not include any header information. The list does not need to be comma delimited. It simply needs to be a single column of charter numbers.
To import peer groups, follow these steps:
- Once you have a .txt file or Excel file of charter numbers for credit unions saved on your computer, click ‘Comparison Set’ at the top of Peer-to-Peer.
- Select ‘Create New’.
- Choose the third option that reads ‘Create a peer group by importing a file of charter numbers’. Make sure to select to use Credit Unions. Then click ‘Create’.
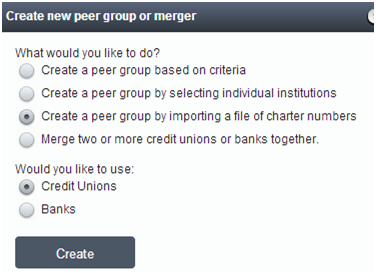
- Click ‘Choose File’ and browse your computer to select the file you saved of charter numbers. Then click ‘Load List’ to see the list of included credit unions.
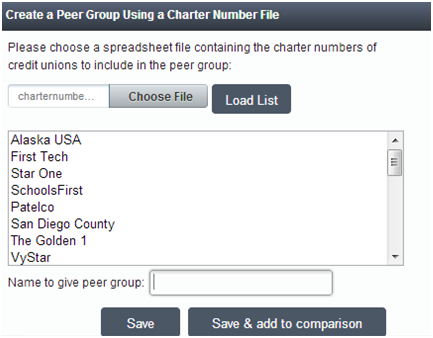
- Name the peer group and click to save it. If you want to use it as a comparison, choose to ‘Save & add to comparison’.
- The peer group can now be found on the ‘Comparison Set’ selection screen in red or under Settings-> Manage Peers.
Manage Your Peer Groups
Go to ‘Settings’ drop-down menu and select ‘Manage Peers’
Peer-to-Peer makes it easy to manage your standard and custom peer groups. You can delete, import, combine, and edit peer groups all in one location.
To manage your peer groups, follow these steps:
- Click on ‘Settings’ in the top menu bar and select ‘Manage Peers’.
- A window will appear that displays your peer groups. In the Manage window, you have the following options:
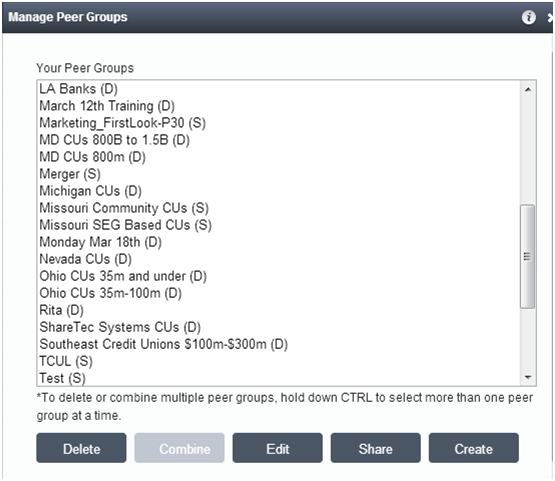
- To delete a peer group, highlight the group(s) and click Delete.
- To import peer groups, you need a .txt or excel file of the charter numbers (no header information) for each credit union you want to include in the peer group. See Import Peer Groups for more information on how to import peer groups.
- To merge peer groups, highlight the groups that you would like to join by holding down the control button and selecting the groups. Then click Combine. Note: You can only combine static peer groups, not dynamic.
- Name the new group in the Peer Group Name text box. Click Save. Important: Peer-to-Peer will not delete the original peer groups that you combined.
- To edit peer groups, click on the individual peer group that you would like to edit and click Edit. This will bring you back to either the Custom Build or individual Select window, depending on how you originally built your peer group. You can now make any desired changes and re-save the peer group.

